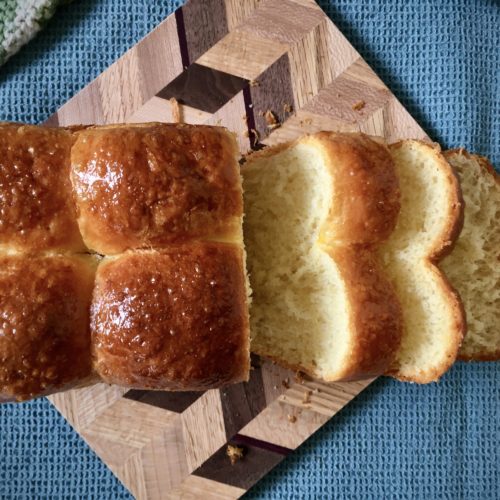
Brioche
Buttery, slightly sweet, enriched bread that is a classic. Form into loaves (Nanterre-style is featured in this post), rolls, fat-belled "a tetes" or any shape you desire. A perfect vehicle for butter and jam, and equally delicious contender for French toast with stale leftovers! This recipe is adapted from The Art of French Pastry by Jacquy Pfeiffer and Martha Shulman.
Equipment
- Stand mixer with paddle attachment
- Thermometer
- Scale (or measuring spoons and cups)
- Rubber Spatula
- Bench scraper
- Kitchen towel or plastic wrap
- Medium bowl
- Saucepan (or microwave and suitable bowl for heating milk)
- Pastry Brush
- Fork or whisk and small bowl for egg wash
- Desired loaf tins (such as the standard 8.5"x4.5"x2.5", or anything approximately this size) and parchment cut to fit bottoms on pans (optional but recommended to further prevent sticking)
Ingredients
Pre-Ferment ("Poolish")
- 3 TB + 2 tsp (50 grams) cold dairy milk, any fat % non-dairy may work as well
- 2 tsp (8 grams) active dry or instant yeast
- 1/2 cup plus 2 TB (60 grams) unbleached all-purpose flour I use King Arthur brand (11.7% protein)
Dough
- Approx. dairy milk, as needed, any fat % non-dairy may work as well
- 3 TB (40 grams) granulated sugar
- 2 3/4 cups plus 1 1/2 TB (340 grams) unbleached bread flour I use King Arthur brand (12.7% protein)
- 4 (220 grams) extra large eggs weight is out of shell; you can use any size egg if you measure by weight
- 1 1/8 tsp (8 grams) sea salt I use fine sea salt; any fine salt will work
- 7 oz (200 grams) butter ideally at least 80% fat, near room temperature
Egg Wash
- 1 (50 grams) extra large egg
- 1 tsp (5 grams) milk, cream or water
Pan Preparation
- 1-2 TB softened butter use enough to generously grease baking pans
Instructions
Day 1: Make the Poolish - Activate the Yeast
- Place 50g of milk at the correct temperature for base temperature of 54C (see notes in post about how to calculate) in the bowl of a stand mixer. Sprinkle the yeast on the milk, followed by the all purpose flour. Do not stir.
- Allow this mixture to sit until cracks appear (15 to 30 minutes at typical room temperatures, and depending on if you're using active dry or instant; instant will generally activate faster) within the flour sitting on top of the milk and yeast mixture, which signals that the yeast has started the fermentation process.
Mix & Knead the Dough
- Have the "as needed" quantity of milk - about 1 cup - ready near the mixer.
- Add sugar, bread flour, eggs and salt to the poolish mixture. Mix on medium speed with a dough hook for about 1 minute. If dough looks very dry or lumpy, add in the extra milk 1 teaspoon at a time, until the dough has formed. The dough should form after about 1 minute of mixing on medium. Take care to add liquid as necessary to prevent lumps - which will not go away if not mixed out at this stage. The dough should be smooth, glossy and slightly sticky.
- Continue mixing for 5 minutes. After 5 minutes, stop the mixer and scrape down the sides and bottom of the bowl, as some dough will have stuck. Sprinkle a small amount of flour on the bowl areas that had dough stuck to it. Mix for 5 more minutes, repeating this process 2 additional times.
- After about 15 total minutes of this 5 minute mixing and scraping, the dough should be formed, be "slapping" the bowl and be entirely wound onto the dough hook. The dough will look homogenous, shiny and smooth. Test gluten development with the windowpane test by taking a small piece and gradually stretching it out. You should be able to gently stretch the dough into a thin layer without it tearing, and it should be semi-translucent when held up to a light source. If not, knead again for 2 to 4 minutes and repeat this test. Development of the gluten now is extremely important for the dough to accept the butter in the next step.
- Add half the room temperature butter to the dough and mix on low speed for approximately 2 minutes. At first, the butter will not mix in, but it eventually will. The butter may appear very soft and be everywhere except inside the dough, but keep mixing on low. After these 2 minutes, stop the mixer and scrape down the sides of the bowl and repeat the mixing for 2 more minutes.
- Once the first half of the butter is incorporated, add the remaining and repeat the mixing procedure for 2 minutes, this time on medium speed, followed by scraping down the bowl. After 5 to 6 minutes, the dough should be homogenous, elastic and smooth with all the butter incorporated.
Dough Fermentation & De-Gassing
- Transfer dough into a medium bowl and cover with plastic wrap. Allow dough to rest at room temperature, ideally around 70F-76F (and under 80F - if the dough gets too hot, the butter may start to melt out), until doubled in volume. Using instant yeast will accelerate this process, but expect this to take approximately 45 minutes to 1 1/2 hours depending on how warm the temperature is. You can create a cozy spot for the dough by turning on your oven light OR placing a hot bowl of water in your oven, and setting the bowl inside the oven - taking care to check the temperature every now and again to ensure it does not get too hot.
- Once doubled, punch down the dough with a lightly floured fist or palm, expelling the excess gasses produced by the yeast. Cover the bowl with plastic wrap, and place in the fridge.
- After 2 hours in the fridge, the dough will have risen and cooled. Press out the gasses once more, cover the bowl, and allow the rest for 8 to 12 hours - ideally overnight.
Day 2: Shaping, Final Proofing & Baking
- Remove dough from fridge & lightly dust a work surface with all purpose flour. Grease two loaf pans generously with butter, and optionally line the bottoms with a layer of parchment to further prevent sticking.
- Scrape out dough onto the floured surface, and using a bench scraper or knife, divide into 16 55 gram (2 oz) pieces, setting aside as you divide the rest of the dough.
- To shape into rounds, remove excess flour from the work surface - you want just enough to prevent major sticking and dough tears, but retain some traction to help provide tension during the process.
- Take once piece of dough, and place your dominant hand over it, cupping it with confidence but not squishing it. Gently press on it, and make clockwise circles to tighten the dough ball. You will gradually release the pressure as the dough ball tightens. There should be a tightness to the final ball, but it shouldn't be flat or torn. If the dough sticks too much to the surface while rolling, very lightly re-flour. The right amount of flour is important - too much and the dough won't have traction, and too little the dough will stick and tear.
- Repeat with the remaining 15 balls, and place the balls into the generously buttered and optionally parchment-bottom lined baking tins, each tin having two rows of 4 balls. The balls will touch each other, but not be overly cramped.
- Mix egg wash by whisking egg and water/milk/cream together, optionally straining.
- Lightly brush the surface of the balls with egg wash, and place tins uncovered in a warm (70F to 76F) area, away from drafts or major temperature shifts. You can optionally spray the dough balls very lightly with water if you have a spray bottle, or place the dough balls in a humid area (such as an oven with a pot of hot water) to help keep them moist and prevent a skin from forming (which will hinder oven spring during baking).
- Allow the brioche to double in volume. This will take approximately 1 to 1.5 hours, depending on the temperature during final proofing. About 30 to 40 minutes into final proofing, pre-heat oven to 350F with racks placed in the center. Remove any racks above the center rack, as the brioche will rise during baking.
- Right before baking, very gently brush the brioche again with egg wash. Place in the oven, and bake the loaves until the brioche is a deep golden brown, and a tester or knife inserted into the center of the loaf comes out clean - about 25 to 30 minutes. Properly baked brioche will have a firm, golden crust that holds its shape.
- Allow to cool slightly before un-molding from the tin, using a thin knife or off-set spatula to help release any stuck areas. Store brioche at room temperature, only packaging once completely cooled. Baked brioche can be tightly wrapped once cooled, and frozen for about 4 to 6 weeks. To thaw, unwrap and allow to sit at room temperature. Refresh loaves by placing in a 350F oven for 5 minutes.
Notes
Never store brioche, or really any bread, in the fridge. Wheat starch happens to retrograde (stale) faster at refrigeration temperatures. When freezing, bread travels through the "staling danger temperature zone" twice, so toasting or making french toast or even bread pudding with thawed frozen brioche is ideal.
Non-dairy milk may work in place of dairy milk, but I have not tried this. Most of the browning will come from eggs and carbohydrates (sugars), so the nominal amount of dairy proteins and lactose from the ~3 TB in this recipe is likely able to be replaced. If you try this, let me know how it goes!
Using a stand mixer is the most convenient and efficient way to make brioche dough. Trying to knead in butter by hand is likely cumbersome, messy and may result in poor results due to the warmth of hands melting butter during kneading. I have not tried making brioche by hand, but if you have with success, I salute you! :)