
Like clock-work, as soon as the temperatures begin to drop and the light gradually shifts from cool summer to warm autumn, the inspiration to bake increases in me – exponentially. I can think of few things more comforting than fresh bread, and a challah braid is no less cozy.
Last week, while at the library checking out the cooking and baking books, I was delighted to see Melissa Weller’s A Good Bake. I had briefly picked it up back in May, but didn’t have time to really dig in. After flipping through the pages on Friday night (one of my favorite activities – Friday night with a stack of good baking and cooking books!), I decided that the place to start was her master challah recipe.
I refreshed my starter twice on Friday, once in the morning and once in the evening before bed, and on Saturday morning, I was ready to roll! I mixed the dough in the morning, retarded it during the day, then shaped in the evening, and again retarded for the final proof. Like Melissa, I like to at least have a mental timetable when I make bread, and know that life will happen regardless of my bread plans. Hence the use of the fridge to help control fermentation. We were out and about all day Saturday doing the usual errands, so I was thankful for temperature control!
To refresh my starter (as it lives in the fridge), I was happy to read that I use the same proportions that Melissa suggests in her book. I use 25g starter (straight from fridge storage), 160g 70-74F water and 160g all purpose flour, then allow it to sit for 8-12 hours at room temperature. You can do this refreshment regime once or twice before baking, especially if your starter has been in storage for some time. My starter is lively and robust, so I find that for typical baking and recipes that also include commercial yeast (as this one does), using the first refreshment for the recipe produces great results — no need to waste additional flour if the results do not warrant it. If your refreshment doesn’t look super bubbly and lively (“ripe”) 8-12 hours later, repeat the 25g starter, 160g water and 160g flour regime, and allow to sit for 8-12 hours. Learning your starter personality is fun – but certainly requires some time and patience.
Do not forget to hold-back some of the ripe refreshment if needed, and add back to your starter. I typically have 50-75g starter at all times in the fridge.
What’s more, I also added in 50g of King Arthur in place of the all purpose in the recipe. The result of my proofing schedule and addition of whole wheat were reminiscent of my grandma’s typical bread recipe (side note – her secret sometimes-used ingredient, I have heard from my mom and aunts and uncles, is/was chicken fat).
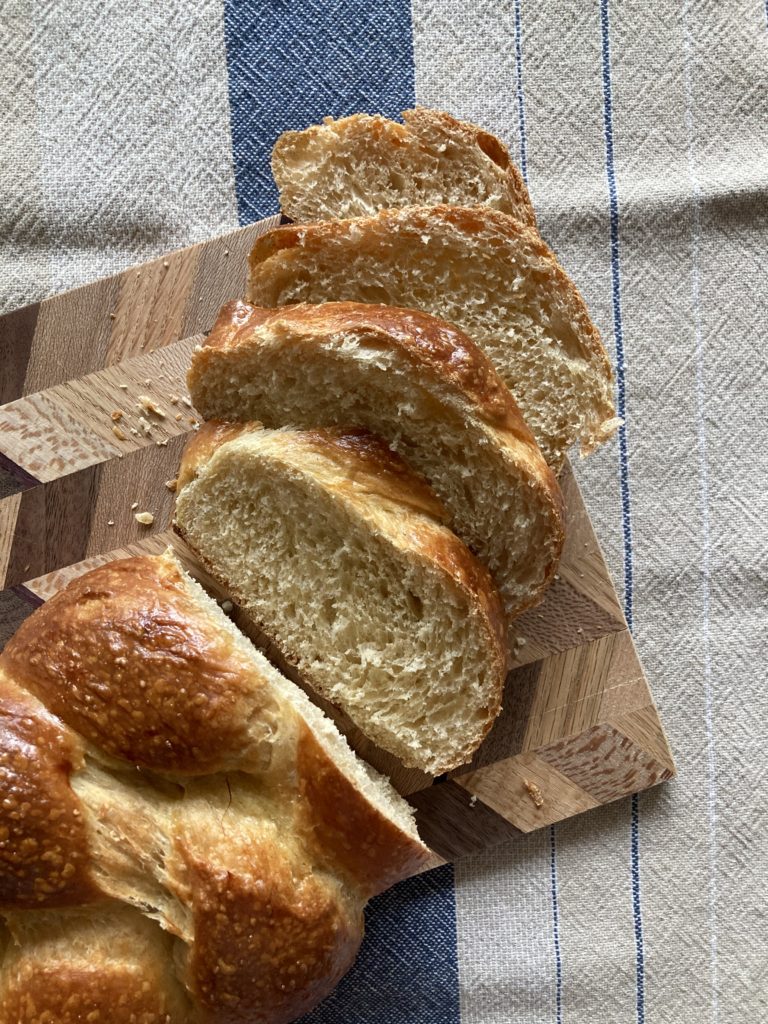
Next time I make this recipe, I will strive to only retard the first proof, and allow the loaves to final proof at room temperature. I say this because while the challah was delicious with a slight sour complexity from the starter, it was just a touch dense.
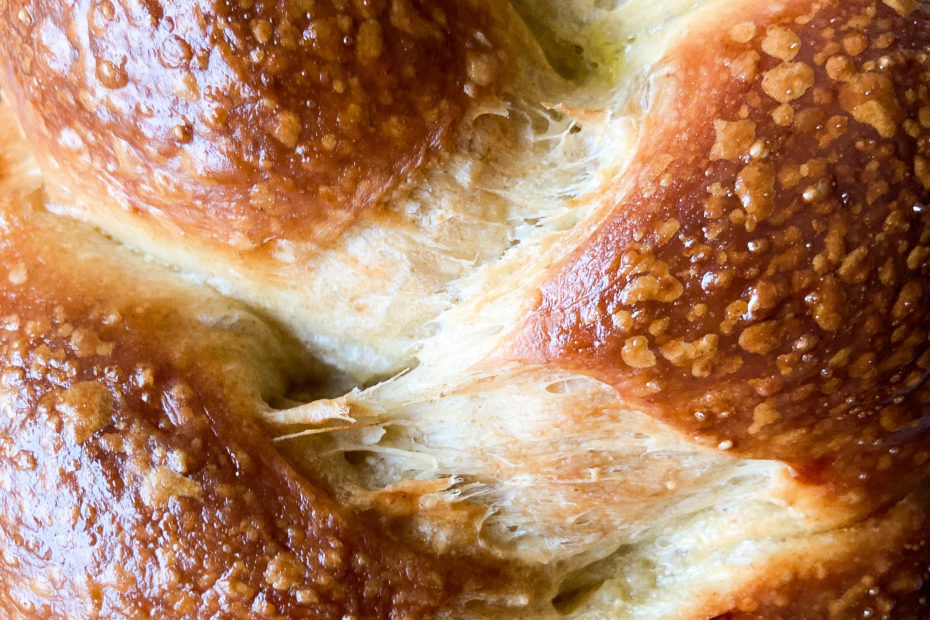
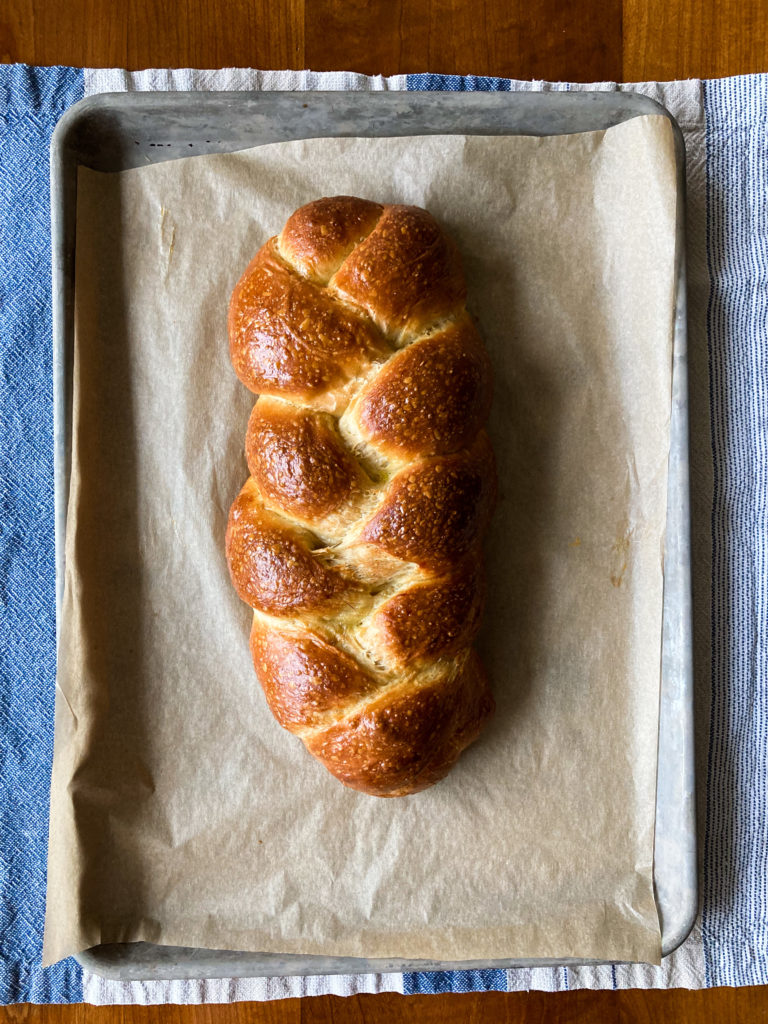
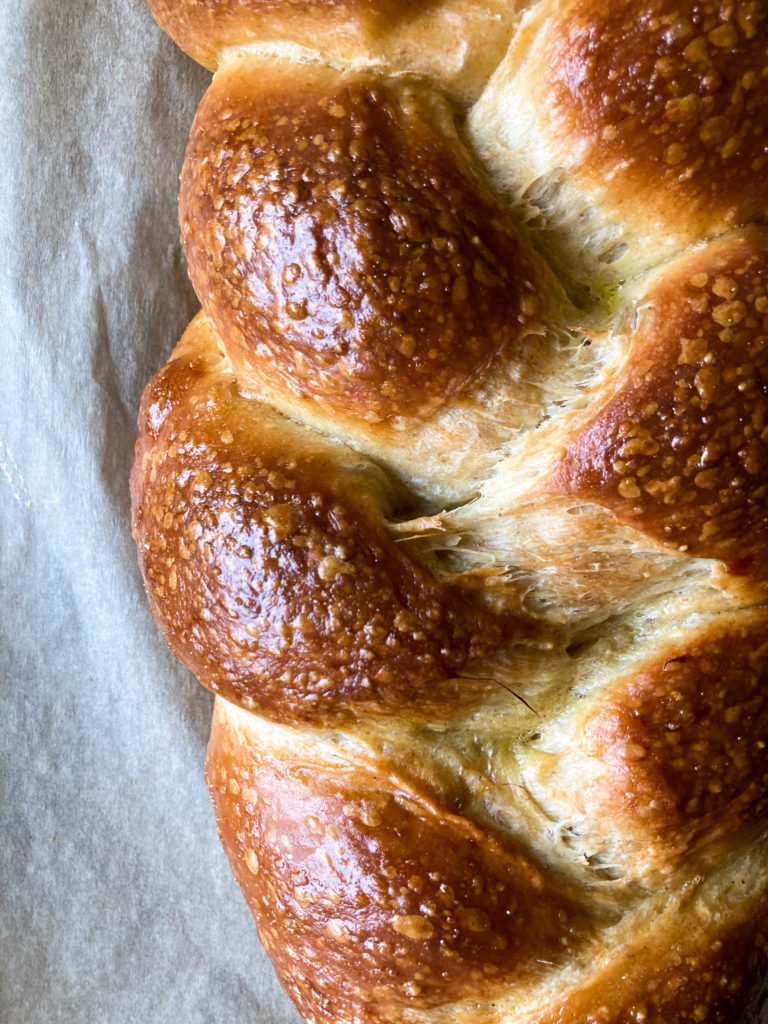
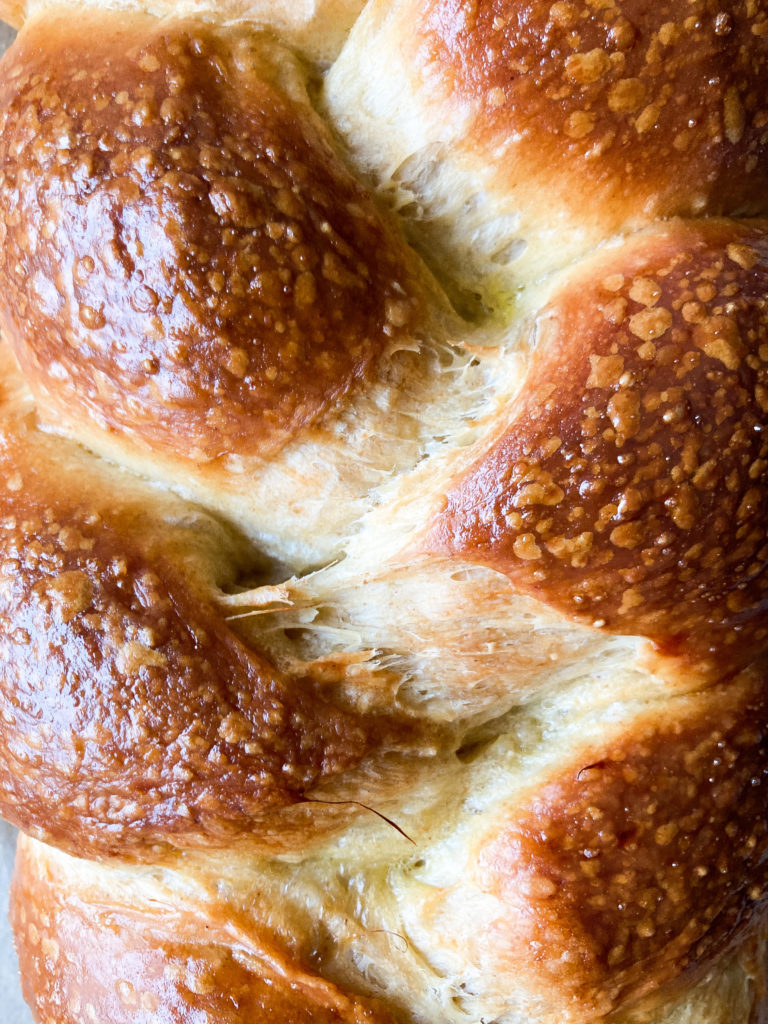
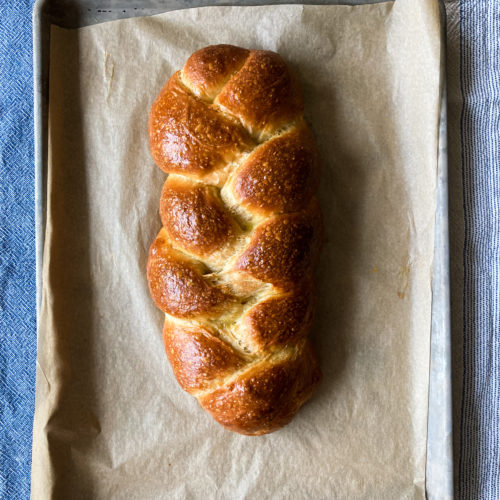
I decided that a simple challah braid would be my loaf shape of choice, and next time, I’ll attempt a more complex crown or 6-stranded braid. I have once before made a crown shape challah with Deb’s fig, olive oil and sea salt version (which is also amazing), but sometimes, a classic 3-strand braid is so satisfying. Hot tip: if you do not have a sourdough starter, Deb’s recipe is really wonderful and uses all commercial yeast.
Enjoy your bread baking and the coziness that results!
Challah Braid
Ingredients
Sourdough Starter (100% hydration)
- 1 1/3 cup (160g) All-purpose flour
- 2/3 cup (160g) Water at 70-75F
- 1 TB (25g) Starter straight from fridge, if stored.
Dough
- 4 cups (480g) All-purpose flour I used 40g whole wheat in place of all-purpose
- 2 TB (26g) Granulated sugar
- 2 tsp (6g) Instant yeast
- 2 tsp (12g) Fine sea salt use any salt desired, as long is it is 12g in weight
- 2 TB (40g) Honey I used a local wildflower honey, but use any desired
- 1 (50g) Large egg
- 2 (34g) Egg yolks from large eggs
- 1/3 cup (83g) Olive oil Use any liquid oil here; grapeseed or canola will be more neutral in flavor.
- 2/3 cup (157g) Water at 70-75F
- 2/3 cup (113g) Ripe sourdough starter
Egg Wash
- 1 Large egg
- 1 Pinch fine seal salt
Instructions
Refresh Sourdough Starter (8-12 hours // night before dough mixing)
- Add 25g starter to 160g all purpose flour and 160g 70-74F water. Mix, cover and allow to ripen for 8-12 hours. The mixture should be very bubbly on top, with a strong yeasty aroma. If not, repeat process one more time.
Prepare Dough & Bulk Ferment (Retard overnight 8-12 hours)
- In a medium bowl, combine the flour, sugar, salt and yeast. Whisk to combine.
- The in bowl of a stand mixer, add the honey, egg, egg yolks, oil, water and ripe starter. Whisk to combine.
- Add dry mixture on top of the wet mixture in the mixing bowl. Fit the mixer with the dough hook. Mix on low for 2 minutes to combine ingredients. Mix on medium for 5 minutes.
- Stop mixer and with a wet hand, scrape dough hook clean. Using a flexible dough scraper, clean sides of bowl and bring dough into a neat mass. Cover bowl with plastic wrap and allow to ferment for 2 hours.
- After 2 hours, turn the dough with wet hands: fold the dough portion nearest to you towards the center of the dough mass, and repeat with the other portion. Then, gently work your way around the dough mass, to make a loose ball shape. Cover, and repeat this process 2 hours later.
- After 4 hours, place dough in the fridge for 8-12 hours.
Shape Loaves & Final Proofing (Optional Retard Overnight)
- 8-12 hours later, remove dough from fridge.
- Onto a lightly floured counter or surface, scrape out the dough using an oiled hand or dough scraper. Lightly sprinkle dough with flour once on counter, and bring into a loose ball shape. Cut dough into 6 160-165g pieces.
- Dust hand lightly, and place your dominant hand's palm on the dough, and roll into a tight round ball, using the tension from the counter. If the ball slips and slides around, that means there is too much flour on the counter. Move to a less floured area, or remove some flour from the counter using a dough scraper.
- Allow all 12 balls to sit for 10-15 minutes to help relax the gluten, and to facilitate rolling the balls into logs.
- Lightly dust hands with flour. Place 1 ball of dough on the counter in front of you, and gently press down to form a thick pancake. Using both hands, pick up the top edge of the pancake, and fold it down by 1/4", and gently press with the tips of your fingers to help secure it. Repeat this, until you get to the bottom of the pancake and have a mini-log. Set aside on a floured area, and repeat with the remaining balls.
- Roll the mini-logs into 12-14" logs. Lightly dust the counter and your hands with flour, just enough to not allow the dough to stick to your hands and counter. If there is too much flour, the logs will slip and slide around as you try to roll to elongate them. Roll under the palms of your hands, working your palms outward with each rolling to help elongate the logs.
- Set logs aside on a floured portion of the counter to rest as you continue to roll the remaining logs.
- Prepare 2 half sheet pans with parchment paper, and bring one to your work surface. Set 3 logs onto the pan, and gently stretch the logs to ensure they are all 12-14" (they shrink up a bit with they are moved).
- Pinch the top ends (furthest from you) together. Then, braid the logs, tugging the logs to get good definition. Once you reach the end of the braid, gently press the ends together. Tuck both the top and bottom ends of the braid under the loaf, making it look as neat as possible. To elongate the loaf, gently press on the braid, ensuring even thickness in the entire loaf.
- Repeat and braid the second loaf.
- Place the sheet pans in the fridge, leaving the loaves uncovered for 30 minutes. After this, cover the loaves with plastic wrap. The plastic wrap will stick considerably less to cold dough. Proof the loaves 8-12 hours. Take loaves out 1 to 2 hours before baking. The loaves should be very puffy, and when poked, should hold an indentation.
- Alternatively, cover with plastic wrap or a damp kitchen towel, and proof the loaves right after braiding for 3-4 hours at room temperature. The loaves should be very puffy, and when poked, should hold an indentation.
Bake Loaves
- Pre-heat oven to 350F, with racks in the upper third and lower third.
- Prepare egg wash by beating the egg and salt together.
- Apply egg wash with a pastry brush to loaves, taking care to not get too much excess on the baking sheet.
- Bake for 30-35 minutes. Rotate from top to bottom, and front to back, half-way through baking. Allow loaves to cool on the sheet trays on cooling racks.
- Slice or rip apart, and enjoy! Challah will keep at room temperature for a few days, in a plastic bag or other sealed container. To freeze, wrap fully cooled loaves in plastic wrap, then place in a plastic bag or wrap tightly in aluminum foil.